Building a mechanical watch is a blend of engineering, art, and microscopic precision. Even when starting with a pre-assembled movement, the process requires multiple quality checks and carefully choreographed steps.
This expanded guide walks you through the full assembly journey with visual diagrams and illustration placeholders to help bring each stage to life.
1. Initial Quality Control: Inspecting Every Component
Illustration: Component Layout Overview


Components Checked
-
Pre-assembled mechanical movement
-
Dial
-
Hour, minute, and seconds hands
-
Winding stem & crown
-
Case (mid-case, bezel, caseback, crystal, gaskets, chapter ring)
-
Stainless steel bracelet (links, pins, clasp)
QC Checkpoint #1 – Visual & Structural Integrity
-
No dust on movement bridges or balance
-
Hands perfectly formed with no bends
-
Dial printing free from defects
-
Case without scratches or machining marks
-
Crown/stem threads smooth and intact
-
Bracelet links even and secure
2. Regulating the Movement
Illustration: Digital "Timegrapher" Machine
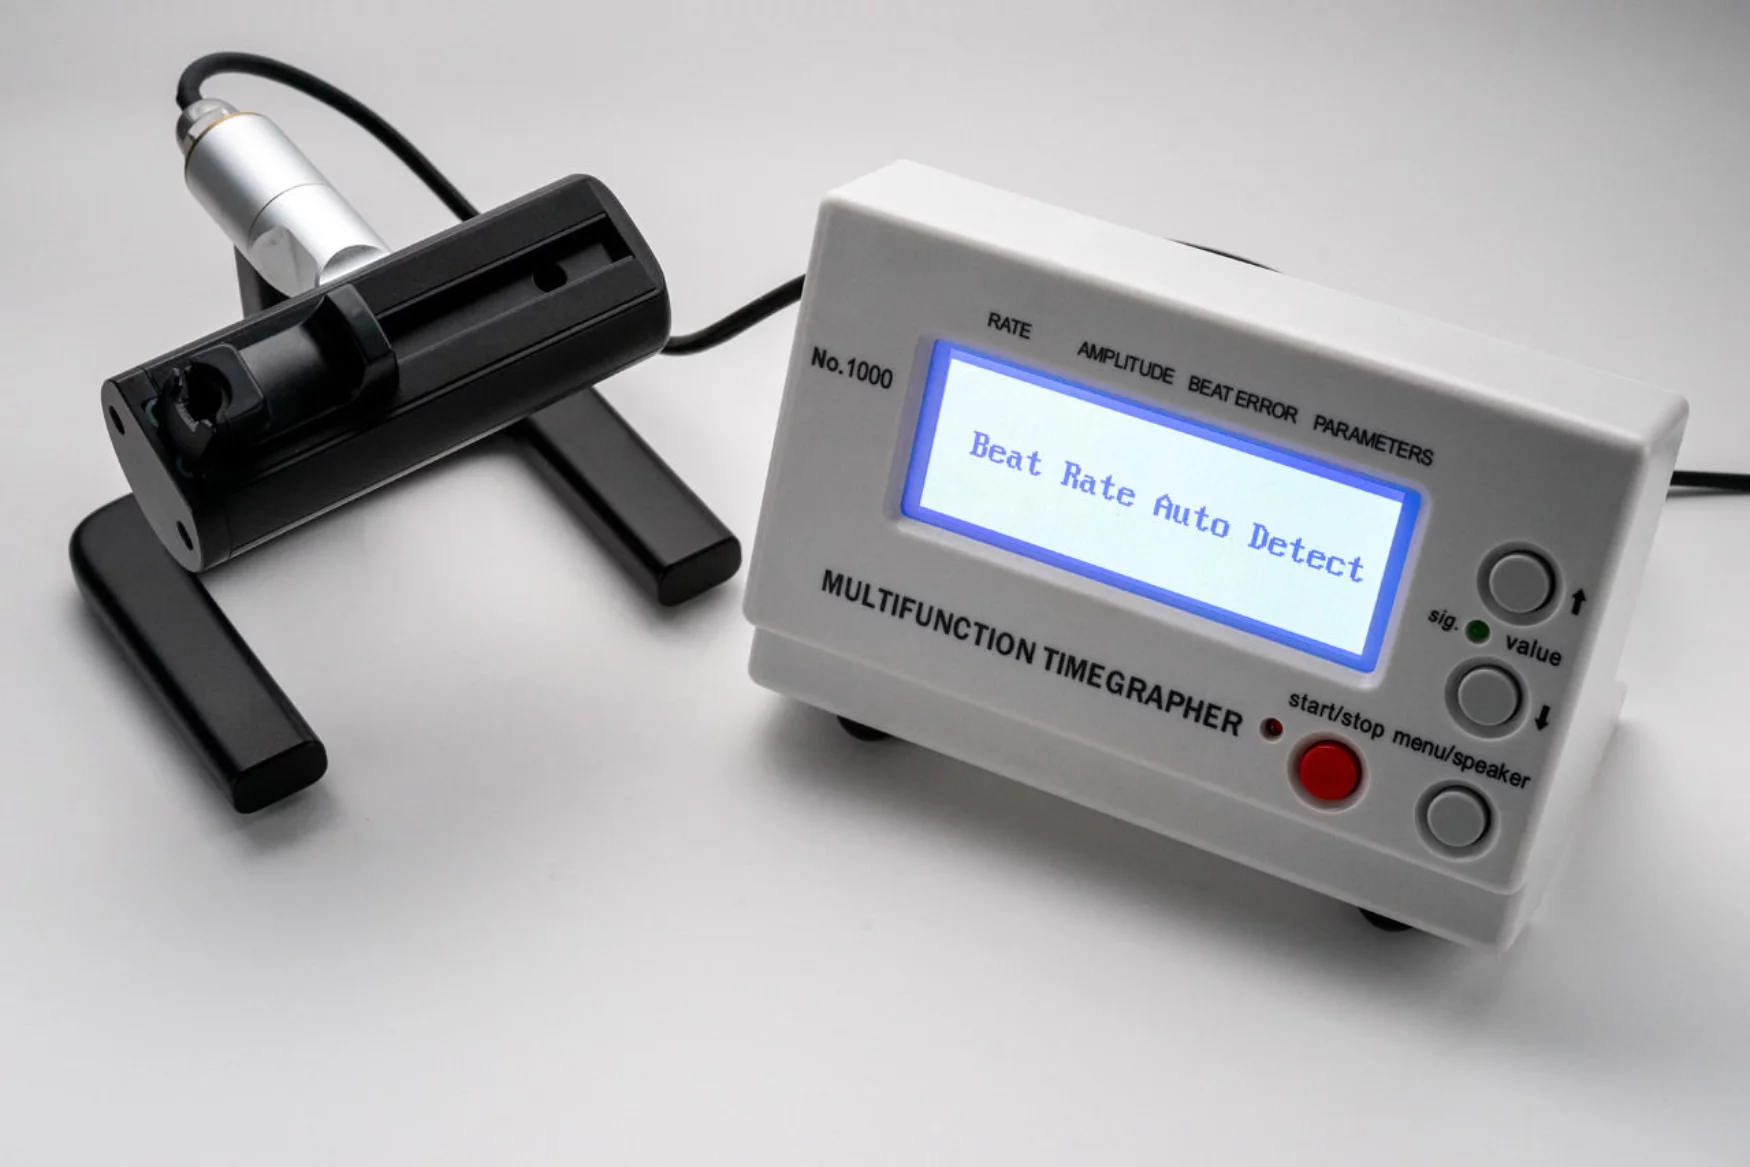
Every movement must be regulated before it becomes the heart of a watch.
At MN Watches, we use pre-assembled mechanisms from different manufacturers. Each type of mechanism comes with it's own specifications and tolerances; we aim to improve on them. For example, Seiko (TMI) movements typically state an accuracy of between minus 20 to plus 40 seconds per day. We regulate each individual movement for every single watch build, which we do by making micro-adjustments to the mechanism itself, while measuring in real-time using the timegrapher shown above. This allows us to improve accuracy to +/- 10 seconds per day, or better.
Steps
-
Movement placed on a timing machine.
-
Rate tested across multiple positions:
-
Dial up
-
Dial down
-
Crown up
-
Crown left/right
-
-
Adjustments made via regulator arm or balance screws.
-
Beat error and amplitude optimized.
QC Checkpoint #2 – Accuracy Validation
Target specs vary but typically aim for:
-
Rate: +5 to +12 sec/day
-
Beat error: < 0.6 ms
-
Amplitude: 260°–300°
3. Dial and Hand Assembly
Illustration: Dial Installation, logo placement, hands installation


With the movement regulated, assembly begins on the visible side of the watch.
Steps
1. Attach the Dial
-
Dial feet inserted into movement plate
-
Alignment checked under magnification
- Apply the MN logo
2. Install the Hands
-
Hour hand set at 12 o’clock using a press tool
-
Minute hand aligned precisely with the hour hand
-
Seconds hand installed last, requiring the most delicacy
QC Checkpoint #3 – Hand Clearance & Alignment
-
No hand touches another at any point throughout the 12 hour cycle
-
No hand grazes the dial
-
Smooth sweep of the seconds hand
-
All hands strike 12 perfectly during reset
A note on hand installation: for any movement that has a day/date complication, hand setting carries an additional level of complexity. The hour & minute hands must cross the 12 o'clock hour marker at the exact time the day/date rolls over. This must be carefully done and double-checked before moving to the next build step.
4. Measuring & Cutting the Winding Stem
Diagram: How a Winding Stem Fits a Movement


The stem arrives long and must be cut to the precise length required by the case.
Steps
-
Temporarily case the movement to estimate stem length. A digital calipers is used to precisely measure the required stem length.
-
Remove the stem and cut using a stem cutter or saw.
-
Deburr the newly cut stem end.
-
Thread the crown onto the stem and test winding action.
QC Checkpoint #4 – Operation of the Crown
-
Crisp clicks when pulling to setting positions
-
Smooth winding with no grinding
-
No wobble in the stem tube
5. Casing Up the Watch
Illustration: Casing Process


Now the watch begins to resemble its final form.
Steps
-
Lubricate and install gaskets (aids water resistance)
-
Insert the movement with dial and hands into the case
-
Secure with clamps and screws, or internal movement holder
-
Install crystal or ensure it is dust-free
-
Screw or press the case back into place
QC Checkpoint #5 – Water Resistance & Alignment
-
Dry pressure test
-
Perfect alignment of dial, chapter ring, rehaut
-
No trapped dust under the crystal
6. Bracelet or Strap Fitment
Illustration: Bracelet Installation

The final wearable component is added after the watch head is complete.
Steps
-
Insert spring bars and attach bracelet end links
-
Check articulation of links
-
Adjust bracelet length for proper fit
QC Checkpoint #6 – Wearability Testing
-
Clasp releases and locks securely
-
No sharp bracelet edges
-
End links sit flush with the lugs
7. Final Quality Control
Illustration: Final Watch Testing

This final stage ensures the watch meets all standards before delivery.
Tests Performed
-
Rate testing in all positions
-
Power reserve measurement (where relevant)
-
Full function test: winding, date switching, hand setting, crown
-
Aesthetic inspection under a loupe
-
Bracelet tension and clasp strength
-
Crystal, case, and dial cleanliness
QC Checkpoint #7 – Certification for Release
A watch is signed off only when it meets:
-
Mechanical accuracy
-
Functional performance
-
Aesthetic perfection

Conclusion
Bringing a mechanical watch to life is a meticulous combination of science and art. Every component is checked, rechecked, and integrated with precision. From regulation and hand-setting to casing and bracelet fitment, the watchmaker’s role is one of both discipline and creativity.
Ready to start building your collection? Browse our mechanical watches now!
Learn more about MN Watches and our design philosophy here.
To see our most recent watch builds, click here.